
")
Table of Contents
- Introduction
- General
- General Safety
- Lines
- Valves
- Heat Exchangers/Reboilers
- Pumps and Compressors
- Vessels/Columns
- Furnaces/Boilers
- Relief Systems
- Electrical
- Instrumentation
- Underground
- Civil/Architectural/Structural
1. Introduction
The purpose of this document is to lay down a review procedure to ensure that the desired level of quality for the fabrication of a piping model is carried out in the engineering office and that sound design criteria for operability, safety and maintenance have been observed.
This check list may also be used for the recording of the check, appropriate space is left for any comments against a checked item in column “remarks”.
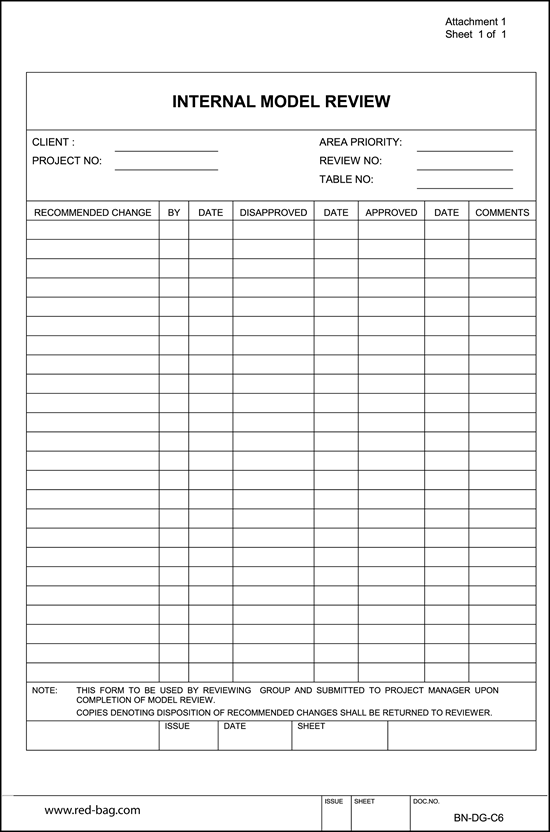
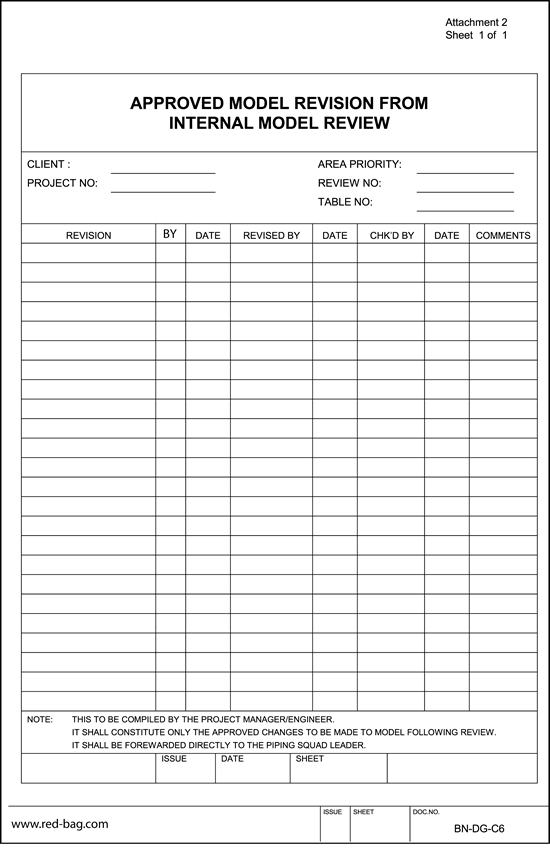
Additionally the form “internal model review” (see Attachment 1) and the form “approved model revisions from internal model review” (see Attachment 2) may be used for reporting purposes.
2. General
2.1 Check the model against the latest issue of the plot plans, engineering and utility flow diagrams and line tables.
2.2 Follow the line up systematically and pay strict attention to details since many accidents are caused by seemingly minor items.
2.3 Mark on the engineering flow diagram all the lines, fittings and instrumentation which have been checked.
2.4 Make sure that when a modification, addition, elimination or reduction is considered, that it suits its purpose, is practical and also economical. When in doubt consult others.
2.5 Use this procedure for a number of items which can not be shown on diagrams. Please note that the checklist does not pretend to be complete and under no condition it shall overrule sound judgment.
2.6 Check that the code has been used correctly.
2.7 Check that the correct scale (1:33-1/3 or 1:25) is used. (Preferably same scale as used on piping GA’s).
2.8 Check that North arrow, match lines (with coordinates), base number, unit number and battery limit tapes have been properly tagged and located on each table.
2.9 Check that all equipment, instruments and lines have been tagged in accordance with equipment lists, flow diagrams and line tables, check location of nozzles and connections and check flow direction pipelines.
2.10 Check that coordinates and elevations are properly indicated.
2.11 Check if construction can build the unit(s) economically as designed.
2.12 Check that start up and shutdown problems have been considered and drain let-down facilities have been provided.
2.13 Check the accessibility for operation, maintenance with mobile equipment and inspection.
2.14 Check location of future equipment (tape indicated).
2.15 Check location of drop out areas (tape indicated).
2.16 Check that perspex plate with model symbols and color coding is available.
2.17 Check platforms and ladders for Client standards.
2.18 Check that access ways and roads provide ample head room for vehicles, mobile equipment, etc. required for efficient and safe construction, operation and maintenance of the plant.
2.19 The policy of access to valves, blinds, manways, instruments, etc. shall have been established during lay out stages and before model work commenced. Check model for consistency of approach.
2.20 Package units are not normally modelled in detail and are usually shown as a block. Ensure adequate space is available for access and for removal of components of the package unit.
2.21 Check location of particularly noisy equipment, valves, etc. in relation to the frequency of visits by operating and maintenance personnel to the area.
Provision of safety shield or noise shields shall also be checked.
2.22 Check the space required around fired heaters for soot blowing and decoking activities and clearance for burner removal.
2.23 Check that air fin coolers can be installed or handled during maintenance of the plant by means of a mobile crane.
2.24 Check that adequate clearance and maintenance access is provided for plug removal tube cleaning, motors, V-belts, fans.
2.25 Are models available for an operator and a mobile crane with extended arm?
2.26 The model shall also indicate junction boxes, cable trenches, cable trays and trunks, switch gears and power stations, control room, local panels, analyzer houses.
2.27 UG sewers, catch basins, UG sewer collecting vessels (chemical drain or oil drain systems) shall be shown with tapes.
2.28 Check at final stage the package units, if vendor information has been included in the model (use certified vendor drawings of lay out and detailed piping drawings showing all instruments and local panel).
3. General Safety
3.1 Check that fire hydrants are not positioned at the ends of, or in the line with the ends of, horizontal vessels.
3.2 Check elevated equipment and platforms for proper escape routes. Ensure unobstructed and short escape routes at grade.
3.3 Check that ladders and staircases have been installed on the outside of structures. Are staircases provided with turnaround landings?
3.4 Does escape traffic have to pass through structures?
Check companies and/or governmental regulations for safety.
3.5 Check that remote shutdown and valve closing devices are installed at safe locations. Check that equipment concerned can be seen from these locations.
3.6 Check for “chimney gasp” between platforms and/or table tops.
3.7 Check that safety showers and eye baths are located near equipment containing aggressive chemicals (e.g. caustic, ADIP, MEA, HCl, H2SO4, etc.).
3.8 Check accessibility of the unit for mobile firefighting equipment and rescue work.
3.9 Avoid head bumpers, shin splitters and tripping hazards.
3.10 Check that emergency/smothering steam header block valves are at safe distance from protected equipment (e.g. in hydrogen service or near fired heaters). A steam header block valve station could be fire shielded, if required, by brick or concrete wall.
3.11 Make sure that operators manipulating drain valves can see the emerging affluent. The required level gauges shall be visible and funnels must be provided.
3.12 Check that water trapped in goosenecks cannot be displaced by hydrocarbons.
3.13 Check that utility stations have been provided, including those at the main operating platforms, e.g. for the connection of steam lances.
3.14 Check barometric seal height of vacuum equipment for liquids other than water. Ensure that the liquid can be drained as well. Important for the design of the structure elevation.
3.15 Check that platforms have been provided at places where work is expected between maintenance stops.
3.16 Check that open sewer pits are not located near hot pumps, furnaces, etc.
3.17 Check that steam exhaust cannot cause personnel hazards either from spraying droplets of hot water or causing icy or wet surfaces.
3.18 Check that steam rings are foreseen at flanges in overhead lines of thermal cracking units and for lines in hydrogen services.
3.19 Be alert for equipment supported on continuous platforms when sections of these platforms are supported on structures subject to different thermal expansion.
3.20 Check that continuously operating vent stacks are higher than the highest nearby structure (within a safe distance).
3.21 Check the location of liquid relief valves, since its actual height influences the required set pressure.
3.22 Check the location of toxic gases (H2S, VCM etc.) monitoring points, if applicable.
3.23 Check that drains of light hydrocarbons (propane, butane) are protected against freezing (e.g. double valves).
3.24 Check that firewalls have been located correctly.
3.25 Check that levers of plug- and ball valves are not hampering operators on walkways or platforms, levers shall move in the same plane as the piping lay out.
3.26 Check that steam for purging of lines and equipment (e.g. snuffing steam, emergency steam) is dry, provide automatic trap stations with drain assembly upstream of last block valve in steamline.
3.27 Check that process ventlines are routed and oriented to safe locations, (3 meter above highest platform), watch nearest platforms and prevailing wind direction.
3.28 Check location of skirt openings and manholes with platforms and ladders in respect to safe escape route.
3.29 In case of location of water cooled equipment at high elevated platforms, check if the normal cooling water pressure is suitable for this duty, otherwise a booster pump shall be installed.
3.30 To prevent vacuum in equipment located at high elevations, due to siphon operation of the fluid, install a vacuum breaker to suck in air or a process gas.
4. Lines
4.1 Check that piping entering and leaving the unit is logically grouped together.
4.2 Check that valves, blinds, flushing/drain and instrument connections are properly located. Check especially so called manifolds and large control valves. Check in cases where spades are used ISO spectacle blinds, that piping systems are flexible enough to insert these spades.
4.3 Check that piping subject to thermal expansion is anchored at plot limits.
4.4 Check elevation of overhead piping and horizontal clearance of access and/or walkways.
4.5 Check that start-up/circulation lines are short.
4.6 Check that dead ends have been avoided. Check if system can be flushed and drained.
4.7 Check that vapor lines (inclusive steam) branch off from the top of main lines. Prevent pockets in vapor lines. Keep lines sloping to a drum or install drainpoints (driplegs).
4.8 Check that piping subject to thermal expansion is flexible enough. Are supports adequate?
4.9 Check if nozzles and branches on expanding piping are not installed near obstructions, support beams, etc. (to avoid ripping off). Are these lines properly anchored. Are stresses on equipment nozzles within limits.
4.10 Check for pockets in vapor lines where condensation may occur. Has external heating been applied on those pockets which can not be avoided?
4.11 Check that long lines attached to small bore nipples are properly supported to prevent breakage due to vibration.
4.12 Check that lines do not pass through table top, but run alongside. If impossible group lines together passing via a sleeve.
4.13 Check that dead end sections have been avoided (e.g. in water lines).
4.14 Check that piping has been designed to permit easy drainage, venting, flushing, testing, maintenance, insulation, painting.
4.15 Check position of eccentric reducers. Normally straight side on bottom of horizontal lines except in pump suction lines where vapor pockets may cause cavitation the pump.
4.16 Check that compressor suction lines slope toward knockout drum.
4.17 Check that small bore cooling water lines branch off from top of the header. (This to prevent plugging).
4.18 Check that stripping steam lines are short and horizontal or sloping from the last valve.
4.19 Ascertain that two phase flow vertical piping has been checked for flow stability.
4.20 Check that hydraulic (water) hammer conditions have been checked.
4.21 Check that all lines have been properly tagged with line numbers, coordinates, etc. Also check that flow direction has been correctly indicated.
4.22 Check that high temperature and special material lines have been stress analyzed.
4.23 Check that gas is prevented from entering cooling water systems.
4.24 Check absorber gas feed inlets for pockets near the inlet to avoid absorbent in the gas line.
4.25 Check that piping with instrument connections has been laid so that these connections are easily accessible. Check if necessary platforms and walkways have been provided.
4.26 Check anchoring of piping discharging to atmosphere. Pay special attention to screwed piping.
4.27 Check that vacuum equipment steam jets has been hooked up directly to the steam mains, i.e. without any intermediate connections which may suck in air. This is not applicable for vacuum pumps.
4.28 Check (for the same reason), that venting of the gas compressor suction piping has been avoided.
4.29 Check all coordinates on piping for correct configuration and clearances.
4.30 Check that service stations have been properly located. Design also for winterizing (water/steam/air in one insulated box).
4.31 Check for rotary equipment that suction and discharge piping are properly supported.
4.32 Check clearance between piping and structural steel with fireproofing.
4.33 Check that thermosiphon reboilers have been located such that minimum pipe distances and equal vapor distribution are achieved.
4.34 Check required straight piping runs to distributor piping in distillation columns. Only in vertical plains are bends allowed within this straight run.
4.35 If a vent is required on an exchanger for periodically purging of noncondensable vapors, this vent valve shall be accessible, vent line shall be shown on model.
4.36 Check piping arrangements on shell and tube side of exchangers carefully for correct flow of fluids and proper operation of exchangers.
4.37 If symmetrical piping hook up is required to exchangers, airfines or double suction of pumps, check this carefully.
4.38 Keep length of suction piping to pumps to a minimum and prevent pockets.
4.39 Check location of break flanges on piping at shell and tube exchangers and aircoolers to facilitate bundle removal.
4.40 Check that number of passes in a heater are shown and if necessary check that piping is symmetrical.
4.41 Check that location of isolating valves and valves of snuffing steam and emergency steam are at 15 meter distance from the heater at grade and accessible.
4.42 Avoid dead legs in heavy fuel oil lines and waste gas lines.
4.43 In case of steam jacketed sulphur lines provide T-pieces or cross pieces at the end for cleaning the sulphur lines by rigging.
4.44 Check location of relief valves and their good accessibility for servicing.
4.45 Check location of local panels for safe operation and good accessibility.
5. Valves
5.1 Check that valves in overhead pipe tracks have been avoided to the maximum extent.
5.2 Check that chain operated valves have been avoided where possible.
5.3 Check that all valves are installed with the stem pointing upwards or horizontally.
5.4 Check that hand wheels are easily accessible for operation and yet not obstructing walkways or platforms. Check also stems, especially in open position.
5.5 Check that valves for emergency operations are workable from grade level.
5.6 Check that valves that need frequent attention are easily accessible.
5.7 Check valves in vertical lines for possible water traps.
5.8 Check when reduced port valves are installed, that piping is self draining on both sides of the valve.
5.9 Check that hot oil block valves are well accessible in view of fire risk.
5.10 Check that control valve assemblies are located at ground level or on first platform (except when required otherwise for process reasons).
5.11 Check that installation of valves outboard of elevated platforms has been avoided.
5.12 Check that valves or double block and bleeders have been installed in utility connections to process equipment and lines.
5.13 Check that spring loaded and/or extra block valves have been used where valves may freeze-up when draining or sampling.
5.14 Check that process vents and drains are shown.
5.15 Check location/installation of check valves in ditch, lines of pumps or near connection of lines, for example connection of condensate lines from traps to condensate collecting header near to the header.
5.16 Check levers of plug-or ball valves, these shall not obstruct walkways, platforms etc. Levers shall move in the same plane as the piping lay out.
6. Heat Exchangers/Reboilers
6.1 Check that piping arrangement is acceptable with respect to the removal of shell and channel covers as well as the withdrawal of tube bundles.
6.2 Check whether bundles can be pulled and lowered safely from platforms and stacked arrangements (obstructions, hydrants).
6.3 Check stacked heat exchangers for the possibility of oil spills on hot equipment beneath it, especially during maintenance work.
6.4 Check location and operability of all trolleys and lifting beams above exchangers.
6.5 Check accessibility to exchangers for maintenance, bundle removal/cleaning, etc.
6.6 For a thermosiphon reboiler check the elevation difference between draw-off pan and the reboiler for driving force.
6.7 If a vent is required on the exchanger for periodically purging of noncondensable vapors, this vent valve shall be accessible. Vent also to be shown on model.
6.8 Cold fluid enters the exchanger at the bottom and leaves it from the top.
6.9 Check crane access to airfin coolers for maintenance or construction.
6.10 Check symmetrical piping hook-up to several bundles in an airfin cooler or to exchangers in parallel operation. Dead legs in capped headers shall be kept to a minimum or be avoided, use elbows ISO tees at the end of the header. Pockets in outlet piping of aircooled or water cooled condensers must be avoided as well as in the hot vapor bypass lines.
7. Pumps and Compressors
7.1 Check that flow in suction piping is as smooth as possible.
7.2 Check that high points in pump suction lines have been avoided.
7.3 Check that valving around pumps is logical and operable.
7.4 Check volumes which must be drained when a filter or a pump needs to be opened.
7.5 Check that pumps can be safely and easily handled for maintenance.
7.6 Pay special attention to spading-off possibilities.
7.7 Check that priming facilities are adequate.
7.8 Check that facilities have been provided for gradual heating prior to start.
7.9 Check hookup of suction line on double suction pump. Piping layout to be as follows for side inlet:
Straight length from suction flange until bend to be 3D (D = diameter nozzle pipe), no reducer allowed.
In vertical pipe reducer, strainer and valve can be installed.
For top inlet straight length = 5D if suction line runs in length direction of pump motor and 3D if suction line rune in same plane as pumps impeller(s).
Upstream of the bend in the suction line the strainer, valve etc. can be installed.
7.10 Check that pumps operating under vacuum are provided with high point vents, which are connected via a vent line to the top of the suction vessel.
7.11 For vertical pumps no straight length is required.
7.12 If pump handle liquids with temperatures above auto-ignition, this pumps shall be located in safe-areas (not underneath pipe rack) and widely spaced from other pumps. Good accessibility for fire fighting is required and above pumps a sprinkler system shall be installed.
7.13 Piping to compressors. Pockets shall be prevented, lines shall slope to suction drum and suction line shall mostly be steamtraced. Check vendor drawings carefully.
7.14 Check all flushing, cooling, quenching requirements of pumps and compressors.
7.15 Check that sufficient space is available for removal of filters from strainers.
7.16 Suction lines of pumps to be of minimum length.
7.17 Check NPSH of pumps.
7.18 If two pumps are parallel operating the piping hookup at suction and discharge side shall be symmetrical.
On reciprocating compressors safety valves must be located upstream of the discharge block valve
8. Vessels/Columns
8.1 Check location of vents as well as direction of outcoming streams.
8.2 Check position of drain nozzles. Keep them clear from areas where heavy equipment such as fork lift trucks may work.
8.3 Check that manways are within reach of hoisting equipment.
8.4 Check that instrument tappings and local instruments are readily accessible.
8.5 Check that insulation for personnel protection is provided.
8.6 Check that the lines can follow the expansion when heating up/cooling down. Pay special attention to supports on hot respectively cold structures. Check free movement of platforms.
8.7 Check that staircases, platforms, ladders etc. are logically located.
8.8 Check that the layout of platforms, ladders, piping, relief sets, etc. is in accordance with the specified basis for wind and earthquake load calculations.
8.9 Check location and elevation of all piping- and instrument nozzles against requisition of equipment and drawing.
8.10 Check that spectacle blinds or spades are installed (indicated) at the nozzles for pressure test or isolation purposes. Normally required with columns.
8.11 Stripping steam to the columns shall be dry; install KO pot at grade provided with automatic steam traps and drain valve and provide a minimum distance insulated steamline in vertical run without pockets to the steam inlet nozzle of the column.
8.12 Check that sufficient space is available for column erection activities.
8.13 Check that consideration has been given to loading and unloading of catalysts, packing, internal etc
9. Furnaces/Boilers
9.1 Check that piping does not obstruct observation windows, access doors, header box covers, etc.
9.2 Check that space is available for tube withdrawal and cleaning.
9.3 Check that piping at burners is arranged so that insertion/ removal of lighting torches and burner guns is not hampered.
9.4 Pay special attention to safety of fuel system:
- Check that heavy fuel and LBF systems are sufficiently segregated
- Check that provisions are made to adequately prevent liquid fuels from entering steam and gas systems
- Are locations of flame arrestors, straight pipe length etc. of low pressure and waste gas in accordance with specifications?
9.5 Check that emergency/smothering steam valve manifolds are at safe distance. Steam shall be dry. Install upstream of manifold at low point a drain valve and automatic steam trap.
9.6 Check that dry emergency steam is available.
9.7 Check that:
- Branch off nozzles are positioned on top of main
- Steam lines are under continuous slope (no pockets)
- Sufficient steam traps and drain points are provided
9.8 Check that fuel and atomizing steam cocks are within hand reach when looking at the burners through the observation windows.
9.9 Check that the local emergency shutdown switch is at a safe location.
9.10 Check that safety logic (for heater start-up and shut-down) is not located below (vertical) furnace. Normally such a logic is located in a local panel at safe distance (15 meter) from a fired heater.
9.11 One complete burner hookup shall be shown per heater including all instruments and all provisions for safe startup, operation and shutdown of the heater with associated equipment (e.g. fans).
9.12 Check final certified vendor drawings for equipment correctness.
9.13 Check prescribed safety distances, e.g. for example:
12 meter to catch basins
15 meter to process equipment exclusive airfin coolers
22 meter to airfin coolers
9.14 Check that the damper can be operated from grade.
9.15 Check that the flue gas oxygen analyzer is located at grade.
9.16 Check heater or boiler location for maintenance and construction accessibility and also for decoking, regeneration or soot blowing activities.
10. Relief Systems
10.1 Check that inlet lines to relief valves are self draining into process equipment.
Is its proper functioning not hampered by the nature of the process fluid? The allowable pressure drop across the inlet line of relief valve is limited to 3% of the set pressure (at maximum capacity). If pressure drop is too high, the line size shall be increased.
10.2 Check accessibility of the relief valves for maintenance and inspection. Check if relief valves have been installed at proper elevations. Distinguish between valves releasing to atmosphere or relief header.
10.3 Check pressure relief discharging to atmosphere for safe location and direction.
10.4 Check that discharge pipe is drainable. If so, does drain not impinge on other equipment? Have measures been taken to avoid freezing of moisture on relief valve seats in low temperature service?
10.5 Check tail pipes for adequate support against reaction forces.
10.6 Check that the tail end of the vent pipe is within the action radius of fire extinguishing equipment. If not, has a snuffing steam connection been provided?
10.7 Check that length of piping is minimized for safety relief valves discharging into a closed system.
10.8 Check that outlet line from relief valves is self draining into flare header.
10.9 Check that flare lines have no pockets and that they are sloping to the flare knockout drum.
10.10 The back pressure on the relief valves (calculated during the design) shall be checked with the actual layout of the flare system.
10.11 Check destination of outlets from 1” x 1” thermal relief valves to atmosphere or grade for safety.
10.12 In case hooked up to vessel, check if steamtracing is required to prevent plugging.
10.13 Check looking devices of the valves at inlet/outlet of the relief valves.
10.14 Check that valves with Castell lock system (or other system) are properly installed.
10.15 Check that safety relief valves and inlet/outlet lines are adequately supported.
10.16 Check that tail pipes of relief valves require weather protection cap.
10.17 Check that the proper type of relief valve has been specified, for example in waxy service piston type in view of plugging.
10.18 In case of 1” x 1” thermal relief valves, the inlet of the relief valve shall be self-draining to the process line, the discharge line can be connected to a collecting header which shall be discharging under slope without pockets to a vessel. Check if inlet and outlet lines of relief valves shall be steamtraced.
11. Electrical
11.1 Check that all substations, cable trenches and cable trunkings etc. are properly located and not obstructed by equipment etc.
11.2 Check that lighting panels, transformers, welding outlets, junction boxes, etc., are properly located.
11.3 Check that remote control unit of electric motor is properly located versus discharge valve of pump.
11.4 Check that TV cameras are properly located to survey the required area or objects.
11.5 Check that safety switches for shutdown of equipment in case of fire are located in safe areas or an safe distance.
11.6 Columns of pipe racks are normally used to install junction boxes for both electrical and instrumentation purposes.
11.7 Check that orientation and access is not hampered by location of control valve stations, steamtracing stations, utility stations or other piping lay-outs.
11.8 Ensure that instrument and electrical schematic lay-outs clearly indicate which side of the column is reserved for these junction boxes.
11.9 Check location of lighting fixtures.
12. Instrumentation
12.1 Check instrument connections for good accessibility for operation and maintenance and try to group them together as far as practical.
12.2 Check that all instruments are on the model and have been correctly tagged.
12.3 Check that instrument cable trenches and trunks are properly routed and in accordance with applicable instrument and underground drawings.
12.4 Check that local control panels, main junction boxes, etc. are properly located.
12.5 Check location and accessibility for operation and maintenance of all instruments. Mind removable piping on both sides of reactors (swing elbows), here special design is required.
12.6 Check straight length of orifice runs.
12.7 Check clearance above external displacers for removal of floats.
12.8 In case of a package unit is shown as a block, provide a tag list of instruments included in this block.
12.9 Check platform clearance around level gauges, control valve stations, relief valve stations, especially for Camflex type control valves with bypass.
12.10 Show all personnel protection, gas detection points (sniffing points).
12.11 Show all emergency hand switches.
13. Underground
13.1 Check that location of catch basins, manholes is properly indicated. On special request of the client underground lines will be shown.
13.2 Check actual run of drain points to UG system.
13.3 Check location and interface between AG and UG piping of pressure systems, cooling water, fire waters (sprinklers) etc.
13.4 Check that downspouts have been provided (floor drains of elevated floors, fire decks, concrete structures) and agree which department prepares material take off for these.
13.5 Check routing of electrical and instrument cable trenches, and their rising points with respect to UG piping, foundations etc.
13.6 Check routing of sewers in relation to supports required for large bore control sets, etc.
13.7 Check actual positions of fixed fire water equipment (elevated hydrants, monitors, sprinkler manifolds, dry risers, etc.).
13.8 Check that locations of safety showers, eye wash basins and jump-ins are easy accessible and near to dangerous points, and these safety showers are connected to the sewer.
13.9 Chemical sewers (open and closed systems) including underground vessel and pump shall be shown.
13.10 Check that the landings for stairs, supports of platforms, etc., do not interfere with locations of catch basins, manholes and cable trenches.
14. Civil/Architectural/Structural
14.1 Check that column numbers (e.g. in pipe rack) are tagged.
14.2 Check tat elevations of operating floors are shown on tags.
14.3 Check that all structures with bracing and pipe racks are shown, inclusive fireproofing.
14.4 Check operability and location of all trolleys and lifting beams.
14.5 Check that all buildings, sheds, etc. are properly sized and located.
14.6 Check door locations in view of safety.
14.7 Check location of analyzer house(s), if fast loop requirements for correct measurements (samples) will be met.
14.8 Check that bracing of steel does not form an obstruction.
DEFINITION OF PERCENTAGE COMPLETION
The following description is a definition of each percentage complete stage of the piping model. Company normal practice is to make model reviews at 30, 60, 90 and 100% completion.
Definitions
30% Completion
- Battery limits located
- All major equipment located
- Major structure shown
- Major pipe rack shown
- Large bore critical process lines studies on the model
- Piping studies 15 - 20% complete
- Location of unit access ways for mobile maintenance and fire fighting equipment shown
- Comments from Client for operation and maintenance incorporated
60% Completion
- Comments from Client 30% model review incorporated
- Ready for Client’s comments for operation and maintenance
- All equipment located
- Piping studies 70% completed
- All large bore process lines and utility mains shown
- In-line instruments shown for lines installed
- Instruments on equipment located. Local panels shown
- Main cable trays installed
- Underground instrument and electrical cable trench installed
- All structures (concrete and steel), ladders and platforms shown
- All pipe racks shown
- Major pipe supports shown. This includes supporting structures for heater transfer lines, heavy overhead lines, flare lines, etc.
- Major fire fighting equipment located
- Manholes and catch basins located
- Services stations located
90% Completion
- Comments from Client 60% model review incorporated
- All piping shown
- Steam tracing supply and condensate stations shown
- Safety showers, eye baths or jump-in baths shown
- Piping studies 100% complete
- Instrumentation, including cable trays 100% complete. Electrical cable trays 100% complete
- All major pipe supports located
- All sewer and underground fire water mains shown, including manholes and catch basins
- All fire fighting equipment located
100% Completion
- Client’s final comments from 90% model review incorporated
- Model updated to latest issue of PEFS’s, PEUFS’s, line tables, arrangement drawings and final equipment drawings
- All sprinkler mainheaders shown
- Model ready for shipment to site